The Diesel Stop banner

Sinister Diesel / ITP Fuel Bowl Delete and Regulated Return Installed

19K views 16 replies 6 participants last post by  clev  
#1 ·
After spending an entire day rebuilding my fuel bowl with the best Guzzle has to offer only to have it start leaking again 2 weeks later I decided I was done with the POS fuel bowl.

Talked to Dennis about potential differences between the van and the truck, and ordered the post-pump filter kit, and fuel bowl delete with regulated return kit. He knocked off $50 and removed the two pre-fabbed return lines that are intended to go from the rear of the heads to the regulator. The installer is responsible to run the return line from the regulator with the truck kit so that hose is DIY anyway.

Originally we thought the filter mount in the kit (off the inspection cover on the trans) would work.

The kit is well done, all the hoses are teflon lined braided stainless with a clear flexible PVC tubing sleaving it to prevent the stainless from rubbing and damaging other components.

Since I had to do all my return hoses I went with the same hose from Discount Hydraulic Hose:
Discount Hydraulic Hose.com
SAE 100R14A, 5/16". I ordered 10 feet of hose, and only had ~ 3" left.
They sell (expensive) re-usable fittings for those hoses as well:
SAE 100R14 Reusable Hose Fittings > Discount Hydraulic Hose.com
JIC 37 degree 3/8 will connect directly to AN6, the difference is AN6 is mil spec (superior threads, and you can tell when you tighten them down).
I also uses 7/16" id 9/16"od fuel and lubricant PVC tubing from McMaster Carr (5187K74) to sleeve my lines as best I could. It's yellow, so I don't know if it is a bonus or not, but I can easily tell at a glance which lines are supply and which are return.
A note on fabing the lines, I wrapped the area where I was cutting with packing tape, then cut it (slowly) with a chop saw. Wrapped the cut end with a little more packing tape and used some liquid laundry detergent as lube and worked the PVC over it. PITA, but worth the effort.

My pile of parts:

Image


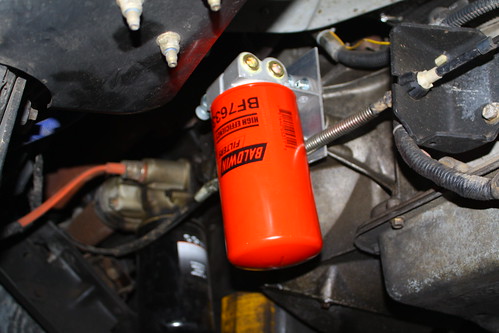
My first step was to attempt mounting the filter as planned. My first step resulted in my first problem. The oil filter mounts closer on the van I guess b/c it immediately was interfered. My solution was to mount the filter off the side of the trans in two unused bolt holes (3/8 16tpi 1" bolts)

Image


I made a mounting plate using 1/8" aluminum and then cut the bottom off the plate in the kit and used to mount the filter to my plate.

Image


More to follow...
 
#2 ·
With the filter mount attached:
Image


I made a guess about which ports to use for the lines, this isn't the final configuration. Mounted to the trans:

Image


Next step was to clear out the engine bay, just followed the kit directions mostly, the only real difference is the AC compressor and alternator locations are swapped on the van. I also had to remove the upper radiator hose. I'd had a squeak on cold start-ups that I thought was an idler pulley, when I pulled the alternator I learned it was the culprit. 130A duralast re-man from Autozone went it.

Image


More to follow..
 
#3 ·
Followed the directions, used some Liquid Wrench and had little trouble getting the fuel bowl out, along with the check valves and test ports.
Installed the fuel bowl delete block and ran the supply hose down the driver's side engine bay. Kit supplied hose was actually long, so routed it to the back side of the post pump filter.
Image


I was able to use the supplied bracket and mount the regulator off the alternator under the transmission dipstick. Made up the hoses, return hose was 83" (including fittings), passenger side was 16", but maybe 15-15.5" would be better. Failed to write down the driver's side return hose.

Image


With hoses run, regulator mounted.

Image
 
#4 · (Edited)
View of the pressure gauge, below trans dipstick. You can see the line from the MAP sensor heading to the boost gauge..
Image


A view of the regulator from the doghouse end:
Image


Decided to commit and be tidy, so a box cutter and bolt cutter facilitated removing all the stock fuel lines...
Image


Cycled the key several times, and dialed the fuel pressure to ~ 68 psi. Had a heck of a time getting to start, but figured I was getting the remaining air out.
Next morning had major cold start issue, started to get concerned.
Long story, tested the GPR and wasn't getting power to the glow plugs. Was getting power to the relay, and the PCM was sending signal voltage. Ohm'd the signal ground and it was 200. Jumped the ground to the battery and still wasn't activating the GPR. So, picked up a new GPR. Tonight I pulled the old one from the dog house end, jumped on the battery and wouldn't click. Tested the new one and it clicked appropriately. Installed it, and jumped it w/ 12v off the battery and it wouldn't click. Jumped the ground to chassis ground and clicked fine. So, installed a new ground and was able to get it to click w/ 12v supplied. Tomorrow morning will tell if the cold start is fixed, I had to move the bracket w/ the GPR and Intake Heater relay to run lines, maybe I damaged the ground. Or it was on its way out and fried the old GPR and I damaged it enough to finally die.

Initial impressions on the FB delete/reg return is it seems to run much smoother, quieter, and throttle response seems improved.

I should probably also note that I installed a dahl 75 pre-pump 10 um filter/water separator this past summer. The post pump setup is not a water separator.

These are the details I recall. The write-up is brief, but it probably consumed about 14 hrs of labor to complete (plus a couple bonus hours dealing with the hopefully fixed GPR issues).
 
#5 ·
Very nice work!!!!!! I want to add a dahl pre pump setup much like yours and after recently rebuilding my fuel bowl I know how big of a job that must have been.
 
#7 · (Edited)
Yes, I'm going to revive a 6 year old thread. I haven't seen anything recent by 505, but sent him a PM anyway; is he still around? I could use his help with a fuel bowl delete.

I have an AIRDOG FUEL AIR SEPARATION SYSTEM 100 GPH that I'm installing after/along with dropping the fuel tank for a Hutch/Harpoon mod. My fuel bowl currently has a serious leak when the drain handle is pulled, so it needs rebuilding........again. I'd like to delete it and read the 505 write-up about deletion. The entire thing seemed a little complicated, but with the Air Dog, I have everything covered up to the bowl. I'm thinking that I should be able to join the input line coming into the bowl with the output line coming out of the bowl, and be done with it. Can it be that simple? I'd appreciate any advice that anyone can offer on this. I'll be starting this job within the next couple of days.
 
#8 · (Edited)
Your bowl currently functions as a pressure regulator/return, two way feed splitter, filter/water separator/drain. Adding the AD takes care of fuel/water filtration. That means you still need something for pressure regulation/return connection, and a way to split supply line to at least 2 lines. This company makes a true regulated return setup (see "Competition" fuel line kit for @$450), if you want the bowl out of there.

http://cncfabricationllc.com/index....roducts/powerstroke-99-03/99-03-fuel-delivery/99-03-fuel-pumps-accessories.html
 
#9 ·
Thanks, stock. I had figured on getting a brass 'Y' with a reducer for the 3/8 in and two out; that should take care of the fuel delivery, but as you mentioned, I need a pressure regulator and return fuel hookup. I also planned on using the existing fuel lines, or making my own, so I shouldn't need a $450 kit. I've installed pressure regulators before, so that's not a problem or a major expense. However, the return fuel is what has me stumped, unless the diesel regulator has an additional port for it.
 
#10 ·
Answered my own question. I just searched for FPR's and the 2 that I read about, each had 3 ports; in, out, and return. Both were about $150. Problem solved, I hope. Now, if I could just figure out a way to drain the fuel tank.
 
#11 ·
FYI, I used the blue fluorosilicone bowl drain o-rings, and all viton bowl o-rings that came with the kit from: dieselOrings.com and no problems ever since! It just didn't make sense to me to re-engineer the whole thing since adding my pre-filter means I don't have to dig in there any more. A clean bowl and the way better than factory o-rings mean no more leaks! The next thing you will have to mess with is the bowl heater delete. That same 30A fuse also shuts down the PCM. I would recommend reading the "Cackle" thread in 99-03 7.3 engine and drivetrain forum. They adressed all this 13 years ago. The most beneficial performance/longevity thing you could do is feed the other ends of the fuel rails as well. I used FRX from RiffRaff but you could also use the hard lines from CNC Fab. Theirs connect directly to the post filter port on bowl. RR FRX connect at the regulator. Either way, you don't end up with a dead headed fuel system, and you also would still have a port to read fuel pressure from.
 
#15 · (Edited)
I believe sixiron got stuck once because of the bowl heater. IIRC you can unplug it near the bowl, & install a new fuse, but your SES light will be on because the PCM senses heater is unplugged. I've always been a little worried about mine going out , because if you have a no start, what would make one think to check this? Also, I wondered if water can corrode element to make it fail. If your bowl is kept clean, would the element last longer? Or its a matter of time due to cycling?
on ediet; answered my own question on how to tell if it is heater element, the WTS light wont illuminate when no power to pcm., thus possible blown fuse.
https://youtu.be/poVKL-6lmtg
 
#12 · (Edited)
I'll take a look at the Cackle thread; I'm surprised it didn't show up on my searches. I rebuilt the bowl in '09, I think, with a Diesel O-ring kit. I don't think the fittings are leaking, but it squirts around the valve when I pull the drain handle. To fix that, I will probably have to pull the bowl. I would prefer to bypass it, but had not thought about the heater; I have everything else figured out.

My Muscular Dystrophy has advanced rapidly the past 3-4 months and I fear that in 6 months, I won't be able to do anything. Right now, I hobble around on 2, locked knee braces and a cane, and scoot around on my butt a lot. My doctor cannot figure out why I'm not confined to a wheel chair yet; I tell him, too much heart, too much grit. And although I rant and rave about working on this van sometimes, I really enjoy it and will miss it when I'm done.
 
#13 ·
Just finished draining the fuel tank, about 25 gallons. I had to get under it and remove the connecting rubber hose between the filler neck and the connection on top of the tank. The hose still wouldn't go in, but then I used a short, bent piece of copper tubing, and after a few pokes (not the Gus kind), I felt something give and the tube slid in. Then I pushed in the 5/16 fuel line, attached it to my Holly fuel pump, and transferred the fuel into a 5 gallon container. I did that in order to keep track of how much came out. Tomorrow is a trip to Lowes for compression connectors and I'll be ready to drop the tank; maybe Monday. I appreciate all the advice that I've received so far.
 
#14 ·
That's why no wheelchair yet, my friend! You haven't stopped long enough for them to put you in one! I know you don't like your fuel bowl, but I know there are two reasons the drain leaks on all drain valves, 1) time and new diesel fuel 2)dirt/grit gets between them and ball valve.
But I think there's an additional reason they leak on the vans. I have owned both 7.3 trucks and the van. The trucks do not have or need the cable we have to drain the bowl. The U shape of the cable puts the center cable under compression when closed. Therefore, it does not want to stay completely closed all the way, especially with driving vibrations. There are two ways to handle it while still retaining the cable. You could add a return spring (like a carburetor) to make the yellow lever return to closed position, OR you could do what I did and make a little bracket with a hole in it. After I drained and worked on the fuel system, I put a zip tie through the little bowl drain handle and through the hole in my bracket. When the little zip tie is tightened, it holds the drain closed positively without it moving towards the open position. Since doing that, everything has been much better!
 
  • Like
Reactions: bork
#16 ·
Evening, guys. I've been doing some reading on the "99&up 7.3" forum, plus other websites on the fuel bowl heater. Everything I've read indicates the heater can be unplugged, bypassed, or just deleted with no problems. I'm going to do a little more research and seriously consider the bowl delete with a FPR.
 
#17 ·
Thought that I'd take a minute and close this thread; for me, anyway. I never got a definitive answer on whether I could unplug the fuel bowl heater or not. It became a moot point after I discovered that the drain hose was partially off of the drain nipple, and that I did not need rebuild the bowl. Maybe the next time, when I actually have to do a rebuild, I'll raise this tread again to see about deleting the fb heater. Thanks for all the advice and help that I've received this past couple of weeks; Maryland dieselnick, stocknocker, bork, just to name a few, have gone over and above to offer assistance. I really appreciate it guys.